Plan Your Layout First: Tape the floor to sketch your arrangement with 3-inch spacing between pieces.
Choose an Anchor: Start with your largest picture in an off-center spot for dynamic balance.
Hang at Eye Level: Mount frames at 57–60 inches from the floor for optimal viewing.
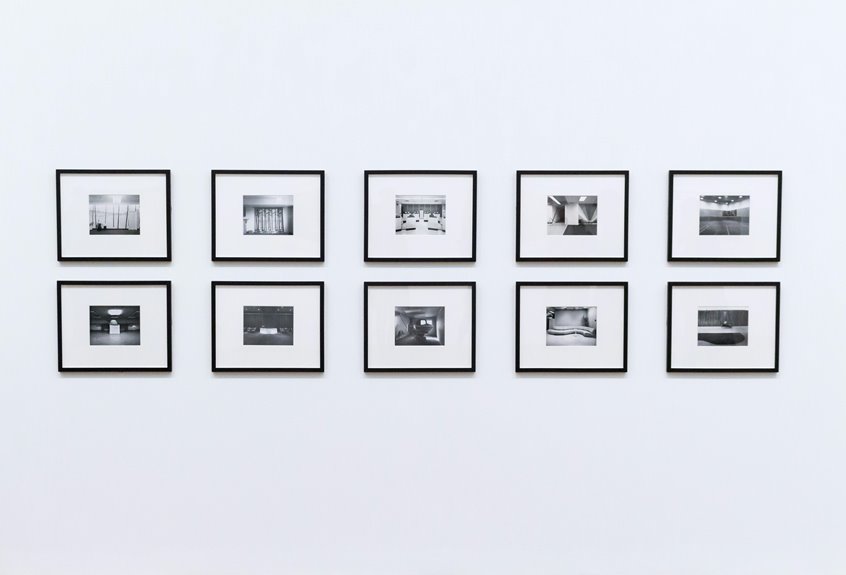
Mix Frame Styles: Combine different frames, orientations, and textures to avoid a monotonous look.
Ground to Furniture: Position frames 6–8 inches above furniture surfaces and maintain consistent spacing.
These strategic steps create walls that function as polished galleries with professional-quality results.
Plan Your Gallery Layout on the Floor (With 3-Inch Spacing)

Plan Your Gallery Layout on the Floor (With 3-Inch Spacing)
Why hang pictures without testing your arrangement first? Floor planning lets you experiment before making wall holes. Lay tape on your floor matching your wall area, creating a spaced arrangement that works for your space.
Floor planning lets you experiment with your gallery arrangement before making wall holes.
Start with larger pieces to anchor your gallery layout. These foundation pieces establish visual balance. Fill gaps with smaller pieces next, maintaining 3-inch spacing throughout for consistency.
Use a paper template to mark exact nail locations. This wall art planning method prevents costly mistakes. Snap a photo of your floor layout once satisfied—you’ll recreate it accurately on the wall.
This layout testing approach gives your wall purpose and direction. You’ll achieve balanced, professional-looking results every time.
Choose Your Largest Picture as the Anchor

Now that you’ve tested your layout on the floor, it’s time to identify your anchor piece. Your largest piece becomes your gallery wall’s reference point for measurement and composition. Position this anchor in an outer corner or off-center for dynamic arrangement rather than strict center alignment.
| Hanging Order | Placement Strategy |
|---|---|
| #1 Largest | Outer corner or off-center |
| #2 Second-largest | Diagonal from anchor |
| #3 Medium | Aligned with anchor |
| #4 Small | Supporting position |
| #5 Smallest | Balanced spacing |
Using your largest piece as reference, measure subsequent hang points diagonally or around it. This anchor-and-expansion pattern guides eye flow through your composition. Smaller surrounding placements maintain balance without competing for attention. Your anchor establishes visual hierarchy, creating a cohesive gallery arrangement with clear focal points throughout your living room.
Hang at Eye Level: Measure 57–60 Inches From the Floor

Once you’ve positioned your anchor piece, you’ll want to establish the correct height for your entire gallery wall. The standard hanging guide suggests measuring 57–60 inches from floor to center. This measurement represents average eye level in most living room spaces.
Measuring Your Art Placement
Start by identifying your artwork’s focal point. Measure from the top of the frame down to this focal point. Subtract that distance from 57–60 inches to find your hanging height. This rule of thumb helps with proper eye level positioning.
Applying Center Height to Multiple Pieces
Use 57–60 inches as your central reference point for the entire arrangement. Balance smaller pieces around this measurement while keeping larger works near this guideline. For seating areas, consider mounting slightly lower to stay within natural sightlines while maintaining your 57–60 inch reference point throughout.
Vary Frame Styles and Orientations to Avoid Monotony

How can you prevent your gallery wall from looking repetitive and bland? Mix mismatched frames, orientations, and textures to create visual interest. Combine horizontal and vertical pieces strategically. Pair large horizontal artwork with smaller vertical frames nearby. Include non-framed elements like photo strips or textiles for variety.
| Frame Style | Orientation | Texture | Visual Impact |
|---|---|---|---|
| Wood frame | Horizontal | Natural | Warm, grounded |
| Metal frame | Vertical | Sleek | Modern, clean |
| Floating display | Mixed | Dimensional | Sophisticated |
| Unframed textile | Horizontal | Soft | Organic, inviting |
Create mini grids by clustering 2–4 pieces into cohesive groups. Use rounded or non-traditional shapes to break strict patterns. Consider magnetic hangers or acrylic displays for textural contrast. Your layout gains depth and personality through deliberate styling choices and hanging tips.
Align Your Wall to Furniture and Ground the Arrangement

Where should your pictures actually go on the wall? The eye level rule guides placement, but furniture anchors everything. Place the bottom of your frame 6–8 inches above the furniture’s top surface. This maintains visual connection between art and pieces below.
Use the 57–60 inch center-height rule as your starting point, adjusting upward based on viewing distance and furniture height. Anchor your dominant piece first—typically your largest artwork. Build your group around it, maintaining 3–6 inch spacing between pieces for a gallery-like rhythm.
For walls with rails or mantels, align your entire cluster vertically with the furniture. This wall alignment prevents awkward gaps or overlaps. Balance matters: distribute visual weight evenly so your eye travels around the arrangement, not settling in one spot.