You can enhance your empty living room wall by choosing: a single statement piece filling 60–75% of wall width; a gallery wall layering multiple artworks along a vertical axis; mirrors reflecting light to expand space; board-and-batten trim adding texture; wallpapered accents with bold patterns; furniture groupings creating visual anchors; or DIY art celebrating personal stories.
Start by measuring your wall, sketching layouts, and using painter’s tape for mock positioning.
Each approach combines negative space with deliberate design to maximize impact while maintaining visual balance—determine which strategy works best for your specific space.
Negative Space as Strategy: When an Empty Wall Is Intentional

The Power of Negative Space
Negative space—the empty areas surrounding objects—creates visual calm. You reduce clutter by displaying fewer items, which balances large walls naturally. This deliberate restraint prevents your room from feeling cramped or overwhelming.
Strategic Emphasis
Leaving portions empty highlights key pieces. Your focal TV wall or statement art print commands attention without competing elements. Empty zones separate clusters, preventing visual chaos and guiding your eye intentionally.
Practical Implementation
Measure wall areas before decorating. Mock layouts using painter’s tape to assess spacing. Some walls can simply work through color or texture alone. Reassess regularly to maintain coherence while preserving unfilled zones that contribute to overall aesthetic balance and room function.
Single Statement Pieces: Fill the Wall With One Impactful Artwork

You’ll want to select a piece that matches your room’s color scheme and style—think a large abstract canvas, dramatic photograph, or bold tapestry. The artwork should fill 60–75% of your wall’s width while leaving breathing room on all sides, creating intentional negative space that frames the piece. Consider placement relative to your fireplace or TV, then mount it at eye level (57–60 inches from floor to center) for visual impact and balance.
Choosing Your Statement Piece
Sometimes the simplest solution works best: one large artwork can refresh an empty wall. You’ll want to select a piece that fits your space proportions and viewing distance. Consider these strong options: a giant photograph, a bold abstract canvas, or a dramatic black-and-white architectural print.
Measure your wall width carefully before deciding. The artwork should feel proportionate without overwhelming your room. A simple, cohesive color palette maintains visual harmony across your wall.
Next, think about surrounding elements. Complement your artwork with minimal décor: perhaps a slim console or low-profile bench. This approach preserves negative space and emphasizes your chosen piece effectively.
Your single impactful piece becomes the anchor for your entire living room design.
Scale and Proportion Matters
The right-sized artwork turns an empty wall into a focal point. You’ll want your piece to occupy roughly 60–80% of the wall width. This scale prevents the art from looking lost or overwhelming your space.
Align the artwork’s vertical center with your wall’s focal axis—whether that’s your TV, fireplace, or seating area. This alignment creates balanced visual harmony throughout your living room.
Consider these proportions: a 48-by-60-inch canvas works well for standard walls. Pair your artwork with minimal surrounding furniture and negative space. This approach emphasizes your artwork without creating visual clutter.
Frame selection matters too. Choose complementary framing that ties into your existing decor. A unified color palette strengthens the entire composition and makes your space feel deliberate and complete.
Placement and Visual Balance
When you’re working with a large, empty wall, one substantial piece can accomplish what multiple smaller artworks can’t: it anchors your entire room. You’ll create visual balance by aligning your artwork vertically with nearby furniture like sofas or console tables. This alignment establishes purposeful flow throughout your space.
Choose between a single large artwork or a restrained gallery wall with consistently sized frames. Either approach prevents visual clutter on expansive walls. Pair your chosen artwork with negative space—the emptiness around it matters just as much as the piece itself.
Consider strategic lighting through wall sconces or dedicated accent lights. These elements enhance your artwork without introducing busy visual competition. This focused approach makes empty walls functional design anchors.
Sizing and Hanging Large Art: Get the Installation Right

Before you hang anything on that empty wall, you’ll need precise measurements and a solid plan. Measure your wall dimensions carefully and sketch your layout on paper first. This prevents costly mistakes and allows your wall art to fit properly.
Secure Installation Essentials
Use a level to keep pieces straight. Locate wall studs with a stud finder for heavy artwork or mirrors. Select appropriate hardware—anchors for drywall, screws for studs—based on your piece’s weight. This foundation prevents damage and maintains safety.
Strategic Sizing
Choose large-scale pieces as focal points. Arrange smaller items in balanced grids along a common vertical axis. Vary frame sizes to create visual rhythm without monotony.
Spacing Strategy
Leave intentional negative space around your wall art. Avoid crowding to prevent visual overload. One or two anchor pieces with supplementary shelving create unity and breathing room.
Gallery Walls: Layer Multiple Pieces for Maximum Visual Interest

Gallery Walls: Layer Multiple Pieces for Maximum Visual Interest
Gallery walls combine multiple pieces into dynamic, cohesive arrangements. You’ll create visual interest by combining different frame sizes and wall art styles.
Planning Your Layout
Start by arranging pieces on your floor first. This approach lets you experiment with spacing and positioning before hanging anything. Align key pieces along a common vertical axis to maintain coherence while spreading elements across the wall.
Mixing Media for Depth
Combine framed art with mirrors, shelves, and textiles. This layered strategy adds texture without overwhelming your space. Balance focal points like TVs or fireplaces by clustering smaller artworks nearby.
Installation Tips
Use wall mockups to verify alignment. Space pieces consistently to avoid crowding. Reassess positioning as you adjust individual items for optimal visual harmony.
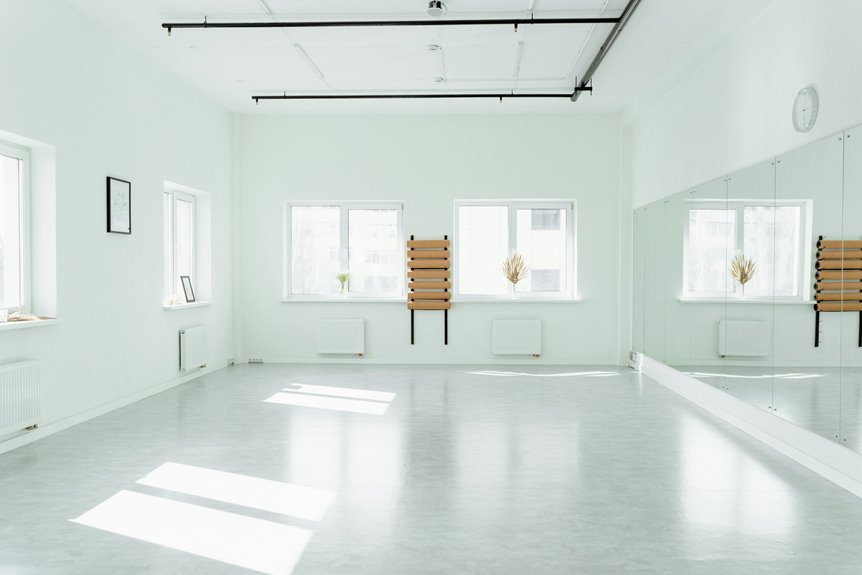
Mirrors for Empty Living Room Walls: Reflect Light and Expand Space

While gallery walls layer multiple pieces for visual interest, mirrors offer a simpler solution that works harder for your space. A large mirror on your empty wall reflects natural light from windows, instantly brightening and expanding your room. Position a tall, slim mirror opposite your sofa to create depth and provide functional viewing angles for seating.
You’ll find that frameless mirrors keep walls uncluttered, while framed antique mirrors serve as focal points. Pairing your mirror with a floating shelf beneath it adds storage without overwhelming the space.
Before installation, locate wall studs and use proper hardware for secure mounting on textured surfaces. This approach gives you a practical solution that improves both functionality and aesthetics in your living room.
Shelving That Works Double Duty: Storage Plus Display

How can you use an empty wall for both functional storage and a stylish display area? Modular shelving systems provide practical storage while showcasing decorative items, plants, and books simultaneously.
| Shelf Depth | Best For | Visual Impact |
|---|---|---|
| 12 inches | Books, small plants | Airy, uncluttered |
| 16 inches | Larger décor pieces | Balanced display |
| Open shelving | Rotating collections | Flexible arrangement |
| Credenza base | Everyday storage | Grounded foundation |
| Wall sconce above | Ambient lighting | Cohesive vignette |
Install off-the-shelf systems like Room & Board styles across your empty walls. Combine shallow shelves with display areas. Add a wall-mounted credenza with a centered sconce above it. Layer in a large framed print spanning the credenza width. This approach keeps sightlines clear while maximizing functionality. Allow flexibility through off-center arrangements or removable art as your needs evolve.
Textured Walls: Board and Batten for Instant Dimension

Board and Batten Trim for Textured Walls
Board and batten trim adds layered texture and vertical lines to blank walls. This cost-effective approach creates architectural interest without major renovations.
Installation on Textured Surfaces
Test your board and batten placement first on orange-peel walls. Apply extra caulk for seamless finishes. Consider using backer board underneath for uneven textures to secure lasting installation.
Maximizing Visual Impact
Combine board and batten with complementary treatments like faux shiplap or wallpapered accents. This layering approach maximizes impact on large blank walls. Use the trim framework to anchor gallery layouts or oversized art pieces. The added depth strengthens your focal point, creating room design that feels deliberate and polished.
Wallpapered Accents: Bold Patterns, Minimal Coverage

Wallpapered Accents: Bold Patterns, Minimal Coverage
Want drama without overwhelming your space? Wallpapered accents deliver impact through strategic placement rather than full coverage.
Why This Works:
- Bold patterns become focal points on otherwise bare walls
- Peel-and-stick options suit renters and DIY enthusiasts perfectly
- Minimal coverage prevents visual clutter in your room
- Subtle textures maintain depth while keeping spaces open
Start with one accent wall featuring your chosen pattern. Pair this wallpapered feature with minimal furniture and plenty of negative space. This approach balances drama with restraint.
Let your wallpaper choice guide complementary decisions. Select art, lighting, and shelving that echo your wallpaper’s colors or textures. This unified approach creates cohesion without overdecorating.
The result: a living room that feels deliberate, modern, and distinctly yours.
Styled Vignettes: Group Furniture and Accessories Into a Focal Point

You’ll create a focal point by anchoring your wall with furniture like a sofa or credenza, then layering art and lighting around it. Start with one large framed piece or two medium prints positioned above your furniture to establish height and draw the eye upward. Balance your arrangement by varying frame sizes, adding a sculptural chair or wall sconce, and leaving negative space so the display feels organized rather than cluttered.
Anchoring With Furniture Pieces
Furniture groupings create visual anchors that organize empty walls into deliberate design statements. On a big wall, strategic placement prevents the space from feeling disconnected or bare.
Consider these anchoring approaches:
- Position a console or credenza with a tall lamp and vertical sculpture to establish a styled vignette
- Shift your sofa off-center, aligning it with a mounted TV or artwork for balanced tension
- Place a low bookshelf directly below your wall’s focal point to extend visual interest vertically and horizontally
- Pair a tall mirror or slender floor lamp with compact seating to draw focus upward
Coordinate colors, textures, and metals across all pieces. This cohesion reinforces your design statement and creates a unified, purposeful look that makes your space feel complete and well-considered.
Layering Art and Accessories
How do you turn an empty wall into a purposeful focal point? You layer strategically.
Creating Visual Depth
Start with a dominant oversized artwork as your anchor. Flank it with smaller prints or accessories. This variation in scale establishes rhythm and depth. Include mixed textures—wood frames, metal accents, fabric elements—to add tactile interest.
Building Your Arrangement
Group items around one central piece or two matching items. Use symmetrical arrangements to echo your focal point. A low console or credenza beneath anchors the entire vignette. Add lighting through sconces or table lamps to draw attention along the wall.
Maintaining Cohesion
Keep your color palette coordinated with your room’s existing design. This intentional layering creates purposeful, inviting design.
Creating Visual Balance and Flow
Strategic grouping anchors your living room wall and creates a composed arrangement.
Your wall becomes a styled vignette when you organize pieces with purpose. This approach turns empty space into a deliberate focal point that communicates intentionality and warmth.
Follow these positioning strategies:
- Place larger items toward the center, positioning lighter pieces toward the sides
- Align key pieces along a common vertical axis to unify the arrangement
- Use varying frame sizes and mixed textures—wood, metal, fabric—for depth
- Keep a cohesive color palette connected to your existing decor
Add a linear shelving unit or tall plant above furniture to extend vertical interest. This prevents the wall from feeling bottom-heavy or sparse. Maintain balance without overwhelming the space by avoiding crowding. Your thoughtfully arranged wall guides the eye naturally across the room.
DIY Art and Personal Touches: Make It Yours

Because you want your living room to reflect who you are, DIY art and personal touches offer the best solution. Personalized art turns bare walls into spaces that tell your story.
| Option | Benefit | Time | Cost | Impact |
|---|---|---|---|---|
| Pet Portraits | Celebrates your pets | 2-3 hours | Low | High |
| Custom Canvases | Unique to you | 1-2 hours | Medium | High |
| Photo Ledges | Flexible display | 30 minutes | Low | Medium |
| Wall Decals | Quick application | 15 minutes | Low | Medium |
| DIY Murals | Bold statement | 4+ hours | Medium | High |
You can create pet portraits from photos or commission affordable custom work. Display personal photography on DIY picture ledges for easy rotation. Wall decals provide removable options if you rent. These approaches build community through shared creative expression while keeping costs manageable and your space truly your own.